Setup and Install BrewPiLess on ESP8266 or ESP32 with Windows
When I was looking for a way to set up a digitally controlled fermentation chamber, I landed on using BrewPiLess for the task. Mostly because all it needed to run the software was a cheap WiFi capable Microcontroller like the ESP. However getting it set up was not as well documented or simple as other open source projects like Fermentrack. The project's web presence was mainly some forum posts on HomeBrewTalk and the GitHub page/wiki. So I thought it would help the community a lot to write a tutorial on getting this set up so more people can benefit from this awesome open source project. To begin, all props to go to Vitotai, the creator of the project!
I'm going to be showing you how to use the source code, compile and flash to your ESP board. I will not be going over how to simply flash a precompiled binary. If you wish to do that, check out this page.
Table of Contents
Getting Started
You'll need a few things to get started:
- Visual Studio Code - A free code editor from Microsoft
- PlatformIO - A plugin for VS Code
- The Source Code for BrewPiLess
- ESP32 or ESP8266
In this tutorial, I'll be covering how to do this on Windows. However doing this on Mac and Linux are not that different except for step 5
1. Setup Visual Studio Code
Begin by heading over to code.visualstudio.com and download the most recent version.
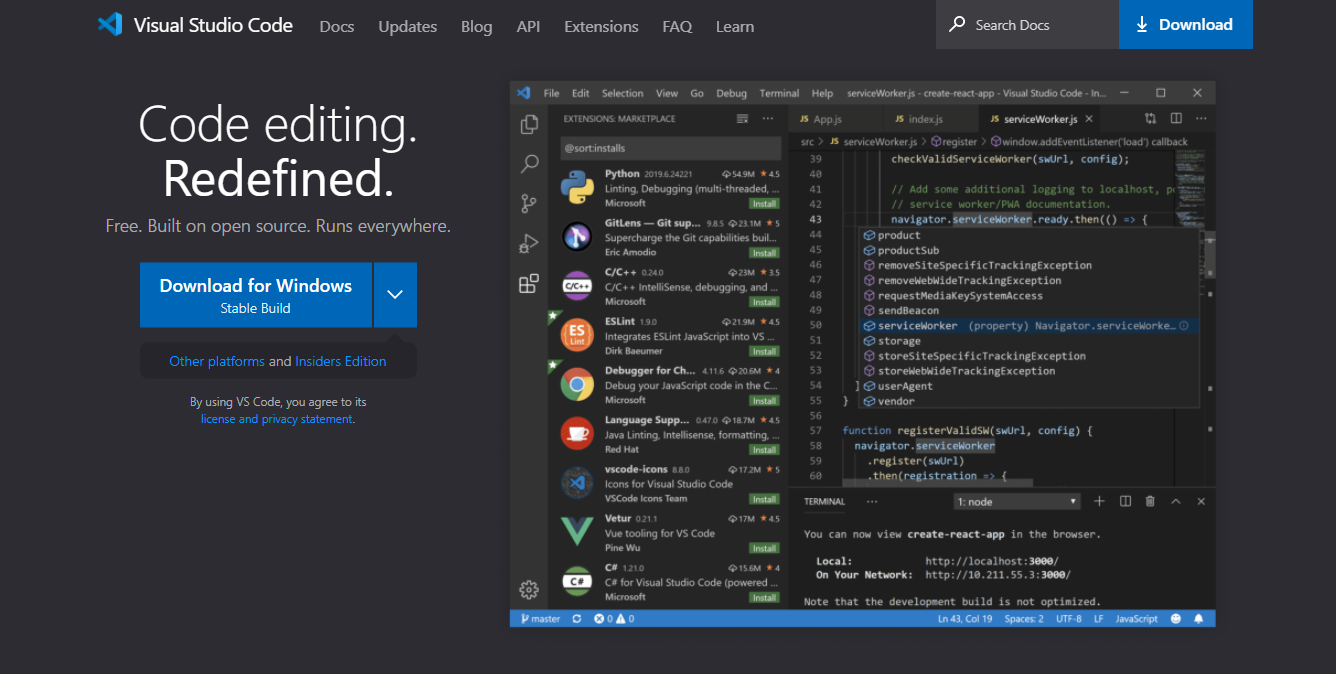
Install and open up visual studio code
2. Install PlatformIO Extension for Visual Studio Code
PlatformIO is an extension for Visual Studio Code. This means that it adds functionality to the VS Code Platform. To install it click on the icon on the far left side of the screen that looks like 4 squares. At the top where I've circled, search for 'Platformio' and you're looking for 'PlatformIO' IDE
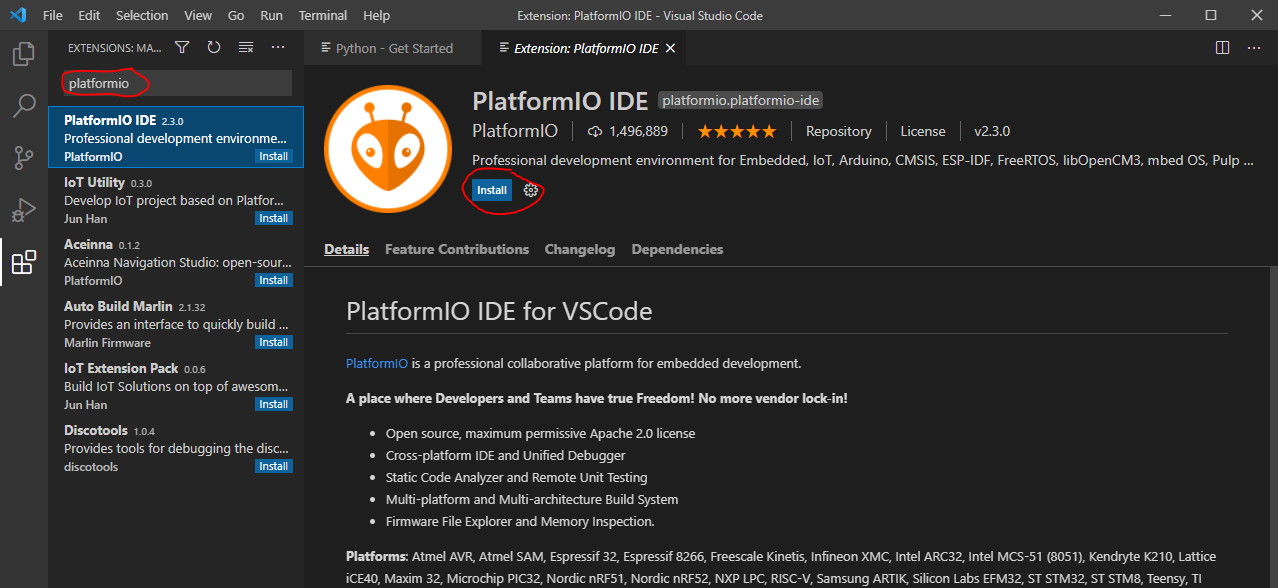
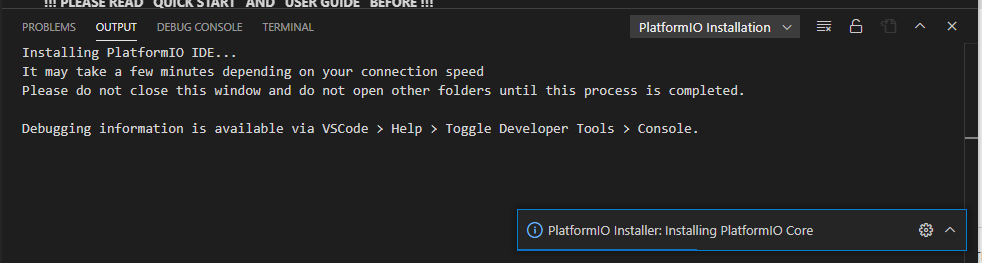
Click install and the install process will begin. You will see a small notification at the bottom of the screen explaining where in the process it is.
An overprotective Anti-virus such as AVG might pop up to let you know it's scanning. Platform IO needs to install a few things in the background and that can set off alarm bells for an Anti-Virus. Don't worry, let the AV scan run, it will give you the all clear after a minute of scanning.
Once the install completes, close and re-open Visual Studio Code.
3. Download the BrewPiLess source code
Being that this code is hosted on GitHub, you can clone the repository to your machine using git. But if you understand what I've just written, I don't think you need this tutorial. So for now let's keep things simple and download a zip.
Head over the brewpiless project page and click the download button, and download the code as a zip file
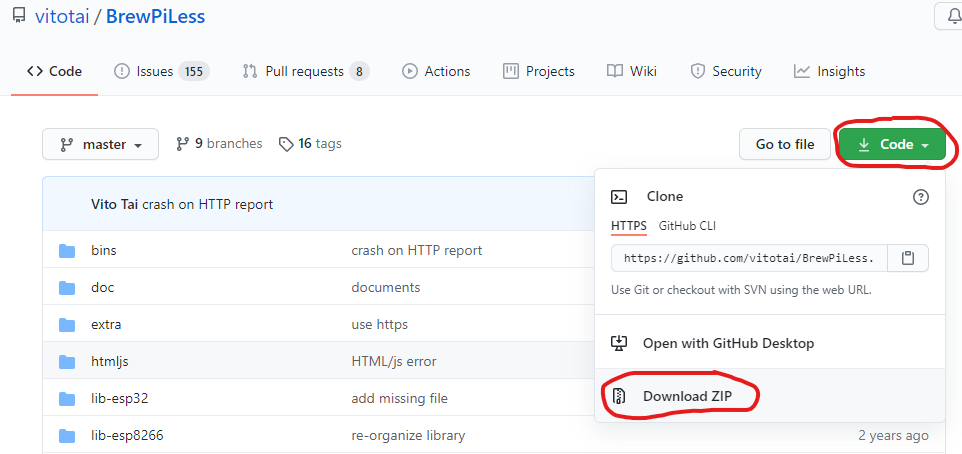
Once you've got that downloaded unzip to it's own folder. This will likely be called 'BrewPiLess-master'
4. Open the whole folder in VS Code
In Visual Studio Code you can open an entire folder to navigate a project right from the text editor. To do this click 'File' -> 'Open Folder...' and choose the folder you created above. You'll see on the left hand side all the files and folders contained in the project.
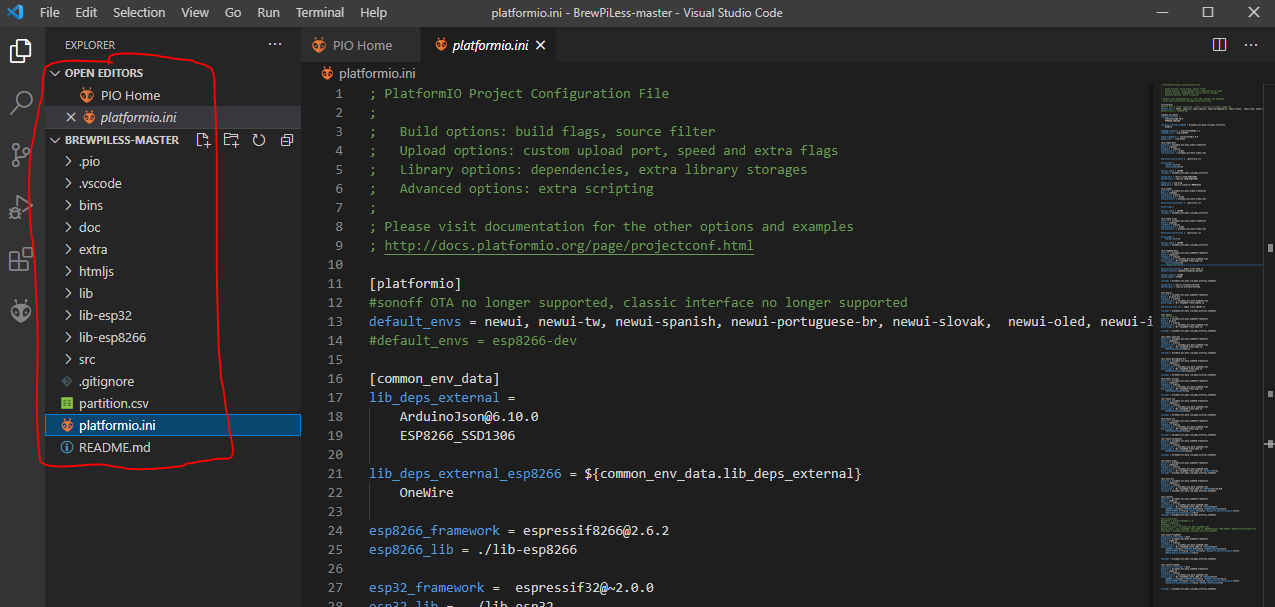
You know you've got the right thing open if you see the 'platformio.ini' file and the small platform IO bug icon now appearing in the left hand menu below the extension icon, where before it wasn't there.
Up until this point, everything should have been going smoothly. Instructions will have worked just fine on Linux, Mac or Windows.
5. Plug in your ESP, identify the COM port it's using
Here's where things get specific for Windows, and the documentation I could find on BrewPiLess got very thin.
If you were trying and failing on your own, check this carefully. Platform.io does not automatically detect the connected board. You must tell it where to look. By default, BrewPiLess is expecting to do the upload from a Linux/Mac machine.
Connect your ESP 32 or 8266 to your machine. Make sure you're using a USB cord that supports data transfer, not all of them do. If you're finding that your computer doesn't recognise the board, check the cable first.
Once connected, search 'Computer Management' in the start menu and open up the app. From in this page, choose 'Device Manager' and expand 'Ports (COM & LPT)'
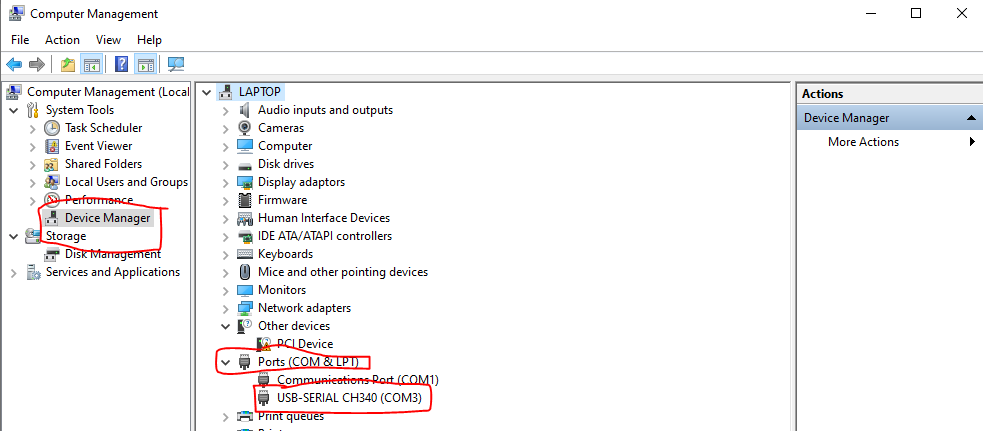
You'll see a USB-Serial device and at the end of it, in brackets it tells you what COM port it's on. We'll need to write this in the platformio.ini file so that when we try to flash the board, it knows where to look for it. If you've been trying and failing to flash the board and haven't modified the platformio.ini file, this is likely the issue.
Back in Visual Studio Code, open up the 'Platformio.ini' file from the right hand side. This file is a list of all the board types that BrewPiLess supports and the required paramaters to upload to it.
If you press ctrl + f to search through the page you can find your board by looking for 'esp32' or 'esp8266'. ESP32 has three options: esp32-dev, esp32, and esp32-oled. The esp8266 only has one and that's 'esp8266-dev'.
The block is going to look like this:
[env:esp8266-dev]
platform = ${common_env_data.esp8266_framework}
board = nodemcuv2
framework = arduino
lib_extra_dirs = ${common_env_data.esp8266_lib}
build_flags = -Wl,-Tesp8266.flash.4m2m.ld
    -DSerialDebug=true
#    -DOLED_LCD=true

board_build.ldscript = eagle.flash.4m2m.ld
monitor_filters= esp8266_exception_decoder

monitor_speed = 115200
upload_speed = 115200

lib_deps = ${common_env_data.lib_deps_external_esp8266}

upload_port = /dev/cu.wchusbserial1410
monitor_port = /dev/cu.wchusbserial1410
Each block including the ones for ESP32 will have an upload_port and monitor_port. By default they're looking for a port that doesn't exist on windows machine.
What you need to do is change the value after the equal sign to the COM port you idenfied earlier in this step. In my case it was COM3
So change these lines:
upload_port = /dev/cu.wchusbserial1410
monitor_port = /dev/cu.wchusbserial1410
To look like this:
upload_port = COM[3]
monitor_port = COM[3]
Where the number in the square brackets is the number beside COM in the computer. In my case it was 3
6. Upload BrewPiLess
Now that you have updated the .ini file to identify the com port you're using, you're ready to flash the board with BrewPiLess.
To do this, click the PlatformIO bug icon on the left hand side to bring up the flashing options.
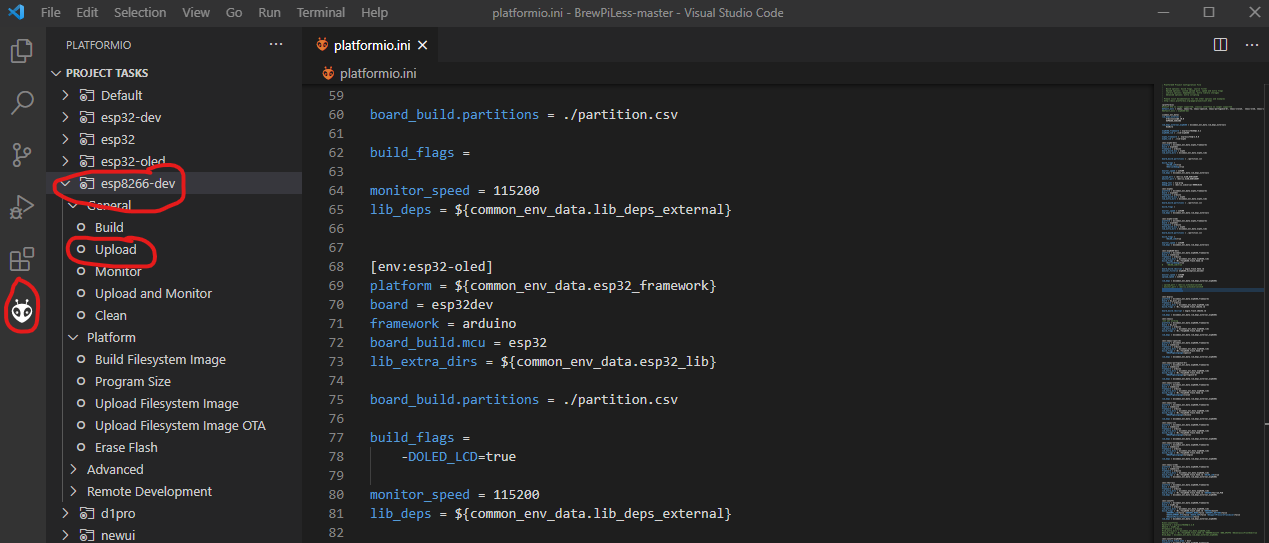
Once you've brought up this menu, select your board from the list and under 'general' choose 'upload'.
This will initiate the build process as platformio complies all the source code into a binary and then flashes it to your board. Congratulations! You're now burning firmware to a micro controller!
The upload process will take about 1 or 2 minutes as it flashes the board with BrewPiLess software.
Once this is complete the terminal window at the bottom of the VS Code window will say SUCCESS
7. Connect to your new BrewPiLess controller
Once the device has briefly restarted, the board will begin broadcasting a WiFi access point that you can connect to. Just open up your wifi settings and look for a network called 'brewpiless'.
The password is 'brewpiless'. You can connect to this wifi from any device that has a web browser, including phones, tablets, your smart fridge?
Once you're connected, open up a web browser and in the URL bar, enter 192.168.4.1 as the web address.

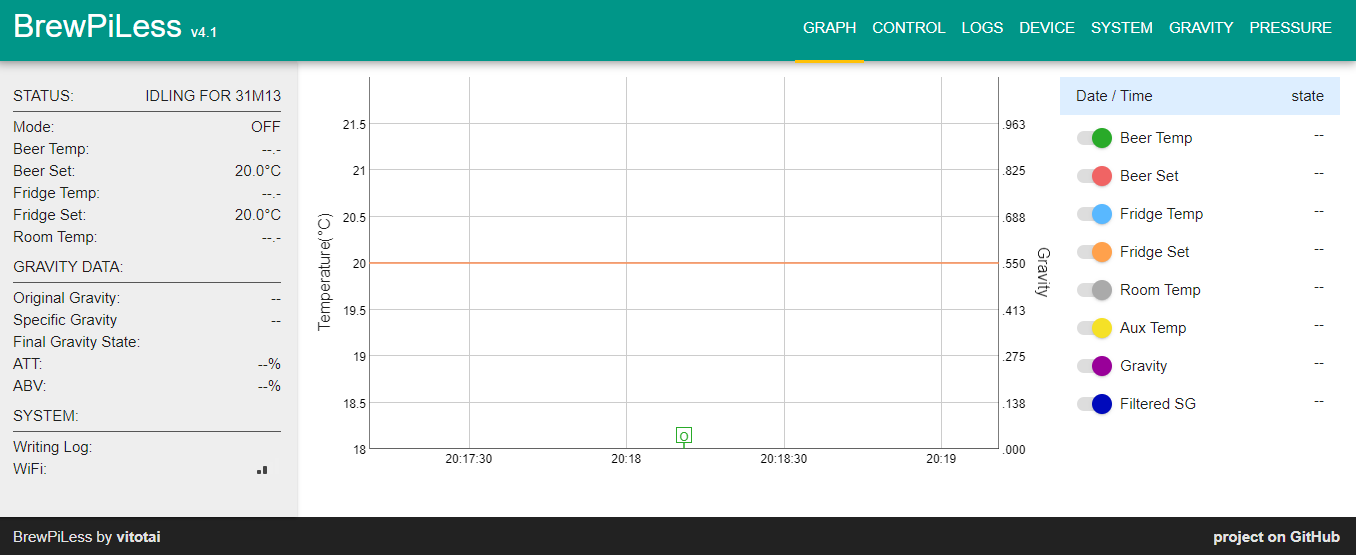
The web page that loads is the running off the BrewPiLess itself!
You've successfully created your own BrewPiLess controller! Give yourself a pat on the back, and why not open up one of your brews in celebration of your monumental success!
Conclusion
In this post we learned how to set up your computer to install BrewPiLess directly on an ESP32 or 8266 wifi micro controller. We haven't begun to explore how to work with BrewPiLess itself once you have it installed, but we'll look at that next, including attaching sensors and live SG tracking.
BrewPiLess is very powerful, and can help you seriously improve your beer. By controlling a fermentation chamber you can keep your beer within 1 degree of a target for as long as you need to. This leads to better tasting beers, but the main benefit is that you are able to actively monitor what's going on without having to open up the fermentor while it's bubbling away.
Thanks for reading, and if you found this helpful why not consider sharing it with someone else who might need it as well!